adsense analytic

Friday, April 28, 2017

How To Use AutoCAD Raster Design Software To Clean & Transform Any Scanned Image Into .Dwg File

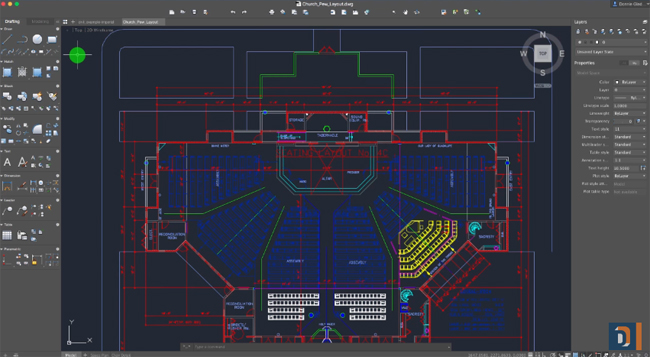
This useful autocad video focuses on how to apply AutoCAD raster design software to cleanse and transform scanned image plan into AutoCAD drawings file. This software is very useful to obtain the DWG files out of scanned images with the use of powerful raster editing and raster-to-vector conversion tools. The users can edit scanned drawings in a common AutoCAD environment.
Some exclusive features of the software :-
Image editing and cleanup
Despeckle, bias, mirror, and touch up any image.
Raster Entity Manipulation (REM)
Apply customary AutoCAD commands on raster regions and primitives. Ability to remove raster images, lines, arcs, and circles efficiently.
Vectorization tools
Generate lines and polylines out of raster images, and transform raster files into vector drawings.
Image transformation functionality
Demonstrate and evaluate geo images in AutoCAD Civil 3D civil engineering software and AutoCAD Map 3D mapping software.
The most updated version is AutoCAD Raster Design 2018 that contains some exciting features like improved scanned drawings with raster-to-vector conversion as well as support for windows 32-bit and 64-bit.
Download a 30-days trail version from the following link www.autodesk.com


~~~~~~~~~~~~~~~~~~~~~~~~
Published By
Rajib Dey
www.bimoutsourcing.com
~~~~~~~~~~~~~~~~~~~~~~~~

Thursday, April 27, 2017

New Railing Feature And Other Crucial Features In Revit 2018

This revit video is created on the new improved railing feature in Revit 2018. The revit users can now include railings to a whole multistory stair tower and topography with a simple mouse click. Besides, railings can be grouped with their host stairs as per their level heights. The users can flip the run line by component in stair.
Some other crucial features are :-
3D Hook for Rebar , this tool can flip your hook around the axis of Rebar and is very useful for create Reinforcement Detailing.
Tag with Thumbnail View originates from the perspective view in the family. By applying crop thumbnail, the users can produce only one region for every tag.
With the addition of magic tools in Revit 2018, it becomes easier for generating the wall layer in edit assembly dialogue. Now, it is possible to generate group out of your preferred layer for each wall and then edit and control this groups and attach them to another walls.

To be familiar with more new features, click on the following link. auto-beta-desk.blogspot.in

Read more

~~~~~~~~~~~~~~~~~~~~~~~~
Published By
Rajib Dey
www.bimoutsourcing.com

~~~~~~~~~~~~~~~~~~~~~~~~

Tuesday, April 25, 2017

Introduction To The New Features Of AutoCAD 2018

Terry Dean, the application specialist in Excitech Limited, has presented this AutoCAD video that is recorded on the new improved features of AutoCAD 2018.
With this new version, it is now possible to design a single detail. AutoCAD 2018 contains some ground-breaking up-to-date tools which can be used to generate incredible 2D and 3D designs as well as almost any convincing shape with your personalized design solution.
One can simply allocate accurate drawings with streamlined documentation and annotation features. Work over the associated platform with desktop, cloud, and mobile solutions, all with the trustworthiness of TrustedDWG™ technology (the original and most perfect way to preserve and exchange design data.
Other significant improvements include external reference path repair and recognition of SHX font files.
PDF import - Import geometry along with SHX font files, fills, raster images, and TrueType text into a drawing from a PDF.
External file references - Save time and reduce frustration through diverse tools to resolve broken paths for externally referenced files
Object selection - Selected objects remain in the selection set, although you pan or zoom off screen.
Text to Mtext - Transform amalgamations of text and Mtext objects to a single Mtext object.
To be familiar with all the new features, click on the following link www.autodesk.com

For more information, watch the video.


Read more

~~~~~~~~~~~~~~~~~~~~~~~~
Published By
Rajib Dey
www.bimoutsourcing.com
~~~~~~~~~~~~~~~~~~~~~~~~

How To Create Curve Staircase – Curve Railings And Modern Stairs Using Autodesk Revit

This classy tutorial examines the procedure of not only creating curved stairs but curve railings and modern stairs also. What you need for this tutorial is the basic understanding of Revit and its execution methodology.
This tutorial is created with the latest version of Autodesk Revit.
Initially you will need to set up the entire interface of Revit to make it work. And then you need to select the tool which would be preferable for you to use such as from stair tool you can select either Stair by Component or Stair by Sketch.
In this way you can create your desired output of curved staircase.

For more information, watch the video.

Read more

~~~~~~~~~~~~~~~~~~~~~~~~
Published By
Rajib Dey
www.bimoutsourcing.com

~~~~~~~~~~~~~~~~~~~~~~~~

Monday, April 24, 2017

How To Create 360 Rendering Panorama With Cloud In AutoCAD

This is another useful AutoCAD rendering tutorial presented by Mufasu CAD. By watching this tutorial, one can easily learn how to produce 360 degree panorama with cloud.
Given below some handy tricks :-
Open rendering autodesk A360 and sign in to your account
After that upload your files and then rendering the project

Once rendering in image is made, just click small icon adjacent to the render image
Opt for Render as and click Panorama Organize your drawing and continue rendering as panorama
Wait unless the rendering gets completed and then review the project
It is also possible to download the project as html
For more information, watch the video.


Read more

~~~~~~~~~~~~~~~~~~~~~~~~
Published By
Rajib Dey
www.bimoutsourcing.com

~~~~~~~~~~~~~~~~~~~~~~~~

Friday, April 21, 2017

How To Perform Hatching In AutoCAD For Designing A Kitchen In 3D

This video tutorial teaches you the procedure to perform hatching in 3D, by creating the tile effect on the walls , floor on the 3D kitchen tutorial.
This CAD video shows the detailed processes for creating a 3D model of kitchen with tile effect on the walls, floor. The video is specifically designed to teach you how to create hatching in 3D. You will be able to various kitchen elements like cabinets, handles, doors, windows etc. 3D.
AutoCAD users and drafters generally apply hatching to demonstrate the type of material that is used to form an object, like insulation, metal, or concrete. Alternatively, hatching facilitates highlight or simplify the extent of a specific component in the drawing.

To carry out a hatching in AutoCAD on a desired plane in 3D dimension, it is necessary to coordinate the user coordinate system or UCS on that specific plane. In this context, the most preferred method will be applying face option of UCS command. Just click on the visualize tab and select face option from drop down menu and click on the chosen plane.

Now, X, Y will be aligned on that plane. Press enter to accept it.
The hatching is performed with the following two methods :-
Ray Casting Method – Here, select a point on the chosen area where a specific pattern will be filled.
Boundary Method – Indicate the boundaries where the pattern should be filled.


For more information, watch the video.

How to perform hatching in AutoCAD for designing a kitchen in 3D


~~~~~~~~~~~~~~~~~~~~~~~~
Published By
Rajib Dey
www.bimoutsourcing.com
~~~~~~~~~~~~~~~~~~~~~~~~

Thursday, April 20, 2017

Enscape For Revit 1.9 Is Just Launched

This Revit video focuses on the new updates on Enscape for Revit 1.9. Enscape for Revit 1.9 is just launched with some new and improved features.
Given below some exciting features of this new version :-
DECALS – With the addition of Decals, it is now possible to apply a new type of visual refinements and fills one of the last small gaps to completely control your Revit model.
SUPERIOR GLASS - Include textures onto your crystal clear materials. Convincingly refract light can be transmitted through glassy. It is known as refraction and facilitates to produce a very precise illustration of glass elements in your scene. The support of material parameters for crystal clear surfaces like color, transparency, glossiness and bump textures has been improved as well as translated into Enscape.
POLYSTYROL MODE - The Polystyrol Mode is also improved with the inclusion of a more physically accurate subsurface light scattering to simulate the light behavior in thin material. The transmission parameter can be modified on the basis of the scale that is necessary for the model to be demonstrated. With reference to light scattering, the Transmission in a 1:50 model is lower than in a 1:100 model.
AUTO CONTRAST AND SHARPENING - A few common and convenient parameters are added in Enscape. The sharpening now sharpens any image devoid of producing dark halos around objects. The Auto Contrast expands the levels of your image histogram to provide the highest color range from black to white. It can recover a bad exposure. Auto Contrast can optimize the visual beauty if the lighting is monotone in the certain view.
To get more information on the new features, go through the following link enscape3d.com/version-1-9


Read more

~~~~~~~~~~~~~~~~~~~~~~~~
Published By
Rajib Dey
www.bimoutsourcing.com
~~~~~~~~~~~~~~~~~~~~~~~~

Wednesday, April 19, 2017

Perform Realtime Rendering For Revit With Enscape

ENSCAPE is a realtime rendering plugin for Revit. It is directly integrated with Revit and obtains all the necessary data from Revit. The users can deliver their project in various phases of the workflow.

There exist a live link among Enscape and Revit and if any modification occurs in Revit, it is instantly shown in Enscape. Discover each amendment immediately. Enscape demonstrates all the modifications in your construction in realtime.


The construction professionals can experience a virtual walkthrough of their Revit-designed building with Oculus Rift / HTC VIVE and Enscape.
Besides, it is possible to export the Enscape walkthrough as a separate executable file to be allocated to your clients or colleagues. They can examine your work and even modify the time of day.
Just set up the Enscape plugin and walk through your projects with only one click.

Download a 14-days free trial version enscape3d.com
~~~~~~~~~~~~~~~~~~~~~
Published By
Rajib Dey
www.bimoutsourcing.com
~~~~~~~~~~~~~~~~~~~~~

Tuesday, April 18, 2017

How To Use Dynamo Revit To Create A Helix Ramp With Topography

This revit video sheds light on how to generate Helix Ramp with topography by Dynamo for Revit.
Dynamo for Revit expands building information modeling with the data and logic environment of a graphical algorithm editor. It is very flexible and associated with a powerful Revit database. It creates a new approach for BIM.
The objective of dynamo is to simplify AEC workflows in Revit and facilitate the users to avail the database of Revit outside of the restraints of the interface.
Revit hosts an extensive API (Application Program Interface) that facilitates the third-party developers to generate custom tools. And programmers apply this API for years, but text-based scripting isn't available to each person. With the help of an accessible graphical algorithm editor, Dynamo standardizes Revit data easily.
With the use of core Dynamo nodes in conjugation with custom Revit ones, a user will be able to significantly extend parametric workflows for interoperability, documentation, analysis, and generation. With Dynamo, laborious workflows are automated when design explorations can flourish.
How to use Dynamo Revit to create a helix ramp with topography

~~~~~~~~~~~~~~~~~~~~Published ByRajib Deywww.bimoutsourcing.com~~~~~~~~~~~~~~~~~~~~~

Monday, April 17, 2017

Brief Demonstration Of Autodesk Revit LIVE

Autodesk Revit Live can transform any Revit model into immersive visualizations with a single mouse click. This video is recorded to show the functionalities between Revit and Revit Live. The users will be able to upload any model directly from Revit or Revit LT to the Revit Live cloud service.
The users can automatically create and make optimal use of their geometry in the cloud and produce a completely immersive model instantly. Revit LIVE facilitate the users to evaluate their design and apply different editing tools to specify navigation points, rectify location-based lighting as well as assign an exceptional render style. Besides, one can upload any model to all the mobile gadgets for distributing the model with the client any time.
The users will be able to “walk through” LIVE visualizations in quickest possible time, viewing rooms and structures from different angles, verying objects, and analyzing whichever elements are most suitable for them.


~~~~~~~~~~~~~~~~~~~~~
Published By
Rajib Dey
www.bimoutsourcing.com
~~~~~~~~~~~~~~~~~~~~~

Thursday, April 13, 2017

How To Create A 3D Canopy Model With AutoCAD

This autocad video is presented by Mufasu CAD Channel. The tutorial is specifically designed for beginner’s AutoCAD users to improve their basic level with AutoCAD.
One can learn how to create the 3d model of a canopy with AutoCAD.
Video Source Mufasu CAD
How to create a 3D canopy model with AutoCAD


~~~~~~~~~~~~~~~~~~~~~~~~
Published By
Rajib Dey
www.bimoutsourcing.com
~~~~~~~~~~~~~~~~~~~~~~~~

Wednesday, April 12, 2017

Learn 60 Most Powerful Tips Of AutoCAD Software In 60 Minutes

Lynn Allen, technical evangelist of autodesk, has provided an online presentation where she focused on 60 AutoCAD tips in 60 minutes. One will be familiar with a wide array of productivity techniques which will make your drawings smarter.

Learn some exciting features of AutoCAD which will surely help you to meet the project deadline.
Topics covered :-

1. Gather knowledge for finishing AutoCAD software tasks through smaller numbers of steps
2. Learn to arrange the AutoCAD software user interface for attaining hither productivity
3. Learn to apply the new features from the newest series of AutoCAD software
4. Explore tips from AutoCAD software veterans and gurus

Go through online video

Learn 60 most powerful tips of AutoCAD software in 60 minutes

~~~~~~~~~~~~~~~~~~~~~~~~
Published By
Rajib Dey
www.bimoutsourcing.com
~~~~~~~~~~~~~~~~~~~~~~~~

Tuesday, April 11, 2017

How To Utilize Search Bar In Revit And AutoCAD

This video tutorial will briefly explain how the users can apply the in-built content search bar in Revit and AutoCAD for making general or specific searches instantly.

Inclusion of search bar in Revit 2016 - R2 is the one of the most vital features. The search bar is situated just under the “Types”. This feature will get rid of the issue for scrolling ceaselessly via each parameter to locate the required one. While typing each character, all the parameters are filtered to display only those which comprise of those characters, not only in the Parameter name, but also in the values and formulas. This could also be applied to focus on a specific group of parameters for editing.

Search bar in AutoCAD is used to search for various contents like drawings, hatch patterns, blocks etc.


How to utilize search bar in Revit and AutoCAD

~~~~~~~~~~~~~~~~~~~~
Published By
Rajib Dey
www.bimoutsourcing.com

~~~~~~~~~~~~~~~~~~~~

Monday, April 10, 2017

How To Draw Circle With Various Methods In AutoCAD

This is an exclusive autocad tutorial where the autocad users can learn how to apply different methods in AutoCAD for creating the design of circles. The methods used here vary from radius method, diameter method, 2P (two points) and 3P (three points) methods. The autoCAD users can apply various circle commands.

2P means drawing a circle on the basis of two points on the circumference. 3P means drawing a circle on the basis of three points on the circumference.

3P Method: Initially go to the menu Draw>Circle>3 Points. Then the command prompt will send notification as _3p Specify first point on circle. This is just notifying you to select a point on the screen that will be your first point. Then AutoCAD will send notification to Specify second point on circle i.e. choose another point to draw your circle.


2P Method: This command is mostly effective while going to create circle tangent to arcs, lines or circles. As for instance, if there exist a line and an arc and it is required to produce a circle tangent and among those two objects

How to draw circle with various methods in AutoCAD

~~~~~~~~~~~~~~~~~~~~~
Published By
Rajib Dey
www.bimoutsourcing.com
~~~~~~~~~~~~~~~~~~~~~

Friday, April 7, 2017

Tips To Fine-Tune Particular Components Of A Render Image With V-Ray For Revit

The Chaos Group presents an exclusive video tutorial that is created with V-ray for Revit. The tutorial demonstrates how to modify any particular components concerning a rendered image for managing the final quality of your output in an efficient manner.
With V-Ray for Revit, the designers get the ability to render professional, high resolution images maintaining realistic lights, materials, and cameras. V-Ray for Revit is developed to deal with the largest building models.
V-Ray for Revit's render presets facilitate the designers to equalize quality and speed instantly. One can use draft mode for finding the duplication initially and divert to superior quality for presentations.
Render interactively when you create design. Modify lights and materials and get the results instantly.
There are useful options for IES and HDR image-based lighting together with support for Revit Sun and Sky.
Automatically transform Revit materials to V-Ray's physically-correct format. Adjust material properties with the help of the V-Ray Material Editor.
Render sections easily with full support for Revit's native section boxes.


~~~~~~~~~~~~~~~~~~~~
Published By
Rajib Dey
www.bimoutsourcing.com
~~~~~~~~~~~~~~~~~~~~

Thursday, April 6, 2017

Brief Demonstration Of AutoCAD 2017 And AutoCAD LT 2017 For Mac

This is a useful presentation from the cad expert Gladfelter on AutoCAD 2017 for Mac and AutoCAD LT 2017 for Mac. The newest versions contain some exciting features like more instinctive and adaptable interface, PDF functionality, Macos Sierra Support, Wrapping Up etc.
Sum up of the features :-
From the new File Tabs to the restructured Tool Sets, things become simpler in AutoCAD for Mac 2017.
Any vector-based PDF (formed with AutoCAD, Adobe Illustrator, Microsoft Visio, etc) can be easily transformed to DWG files.
AutoCAD 2017 for Mac is compatible with Apple’s most updated macOS Sierra. Besides, providing basic support for the latest operating system release, support is also provided for its newest features like split view.
The existing subscribers of AutoCAD or AutoCAD LT will be able to download and set up the Mac version. The identical serial number or Autodesk Account that has been applied to install AutoCAD on the Windows PC, can be applied to install AutoCAD on your Mac. The users who possess a single-user subscription to AutoCAD, can easily utilize AutoCAD for Mac by signing into the software with their Autodesk ID.


Brief demonstration of AutoCAD 2017 and AutoCAD LT 2017 for Mac

~~~~~~~~~~~~~~~~~~~~~~
Published By
Rajib Dey
www.bimoutsourcing.com
~~~~~~~~~~~~~~~~~~~~~~

Wednesday, April 5, 2017

How To Upload The Revit Models To Collaboration For Revit

This revit video shows the detailed process for uploading the revit models to collaboration for revit.
Cloud collaboration for Revit stands for a revit cloud service that empowers the project team members to quickly access the most recent revit model from multiple disciplines and locations. The team members will be able to undertake superior, intelligent and instant decisions through real-time communication as well as co-author models with building information management method from various sites.
Collaboration for Revit will unite team members via direct, real-time chat inside BIM project models.
The whole project team as well as non-Revit users get the ability to view, comment on, and mark up models.
Collaboration for Revit facilitates to deal with the projects which need improved BIM collaboration, as for instance projects with multiple locations, joint venture or IPD delivery models, or remote teams.


How to upload the Revit models to collaboration for Revit

~~~~~~~~~~~~~~~~~~~~~~~~
Published By
Rajib Dey
www.bimoutsourcing.com
~~~~~~~~~~~~~~~~~~~~~~~~

Tuesday, April 4, 2017

Learn To Create Roofs By Footprint & Join Complex Roof In Revit 2017

There are different methods in Revit for creating roofs. The easiest one is the footprint roof. A footprint roof is ideal for generating floors. Just select sketchup mode and draw the shape of the roof. Once it is completed, it produces the 3D form easily finished with any slope that is allowed by you.

Initially choose, high roof floor plan. Then go to Architecture tab and click roof button. Here default is roof by footprint. Alternatively, you can go through the dropdown menu and select roof by footprint.

It is possible to place three types of roofs by applying footprint which range from a flat roof, a gable roof and a hip roof.


Learn to create roofs by footprint & join complex roof in Revit 2017

~~~~~~~~~~~~~~~~~~~~~~~~
Published By
Rajib Dey
www.bimoutsourcing.com

~~~~~~~~~~~~~~~~~~~~~~~~

Monday, April 3, 2017

QuickStart Video On Revit Section Box

This QuickStart Revit video provides brief demonstration on how to apply in-built section box tool in Revit for rendering section cuts. Section Box is actually a productive tool that facilitates to get entry to the centre of the model.

You can use a section box to clip the viewable portion of a 3D view. When you enable a section box in a 3D view, the only change to the view is the addition of the section box. The following image shows a 3D view with a section box enabled.

Once the section box is enabled, its extents can be changed with drag controls in the 3D view or from other views.


QuickStart Video on Revit Section Box


~~~~~~~~~~~~~~~~~~~~~~~~
Published By
Rajib Dey
www.bimoutsourcing.com

~~~~~~~~~~~~~~~~~~~~~~~~

Saturday, April 1, 2017

How To Produce Solar/Shadow Studies With Revit

Prior to start a solar study, organize a view to show light and shadows. Apply the following useful tips :-
• Generate a 3D view.
To show light and shadows efficiently on a project, apply 3D views of the building model. Show standard plan views like floor plans and ceiling plans, abstain from demonstrating various elements in 3D, therefore, there will be no shadows to be casted from these elements.
The sun path and shadows can be accessed in all 3D views devoid of those applying the Wireframe or Consistent Colors visual style. In 2D views, the sun path can be accessed in floor plans, reflected ceiling plans, elevations, and sections.

Note: The sun path’s on-screen controls can’t be edited in perspective, walkthrough, or rendered 3D views.
• Rotate a view to True North to perfectly demonstrate the position of the sun concerning the project through solar study.
• While creating a lighting solar study, state the location of the sun corresponding to the view.
Source: knowledge.autodesk.com


How to produce solar/shadow studies with Revit

~~~~~~~~~~~~~~~~~~~~~~~~
Published By
Rajib Dey
www.bimoutsourcing.com
~~~~~~~~~~~~~~~~~~~~~~~~