adsense analytic

Tuesday, January 30, 2018

New updates are available for BIMscript, the exclusive content creation solution by BIMobject

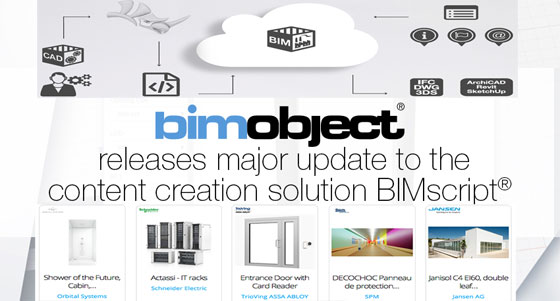
New updates are available for BIMscript, a solution for generating digital building products. The updates provide a superior grade of flexibility and features that unveil the solution for improved product configuration for more product categories, along with a larger scope of products having complicated parametrics, and the complete sector of windows and doors.

With BIMscript the users will be able to make their own digital building products, also mentioned as BIM objects.


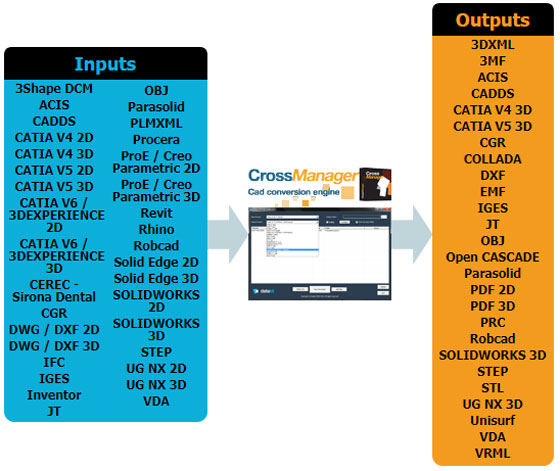
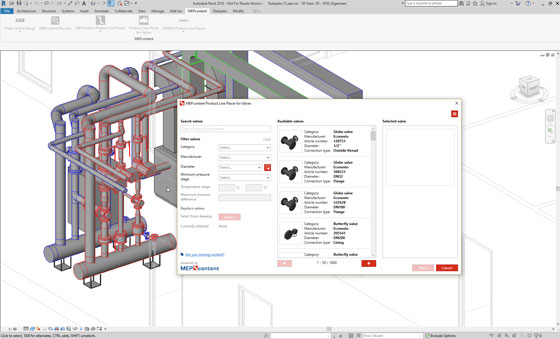
Users can create parametric, native BIM objects in a series of recognized formats for industry-leading BIM applications like Autodesk Revit, AutoCAD, 3DS, Graphisoft ARCHICAD, and Trimble SketchUp, as well as AR and VR formats. These BIM objects are then gathered on the platform BIMobject Cloud, which act as a Single Source of Truth for its over 650,000 professional registered users and in excess of 1,000 represented brands.
The updates significantly enhance the number of product categories that can be formed. These now comprise of windows, doors, and customizable products. The users get the ability to set the parameters according to their choice rather than selecting among a limited number of preset options.
BIMscript now becomes an established scripting language that contains numerous developed BIM objects. The new updates practically eliminate the few remaining restrictions to what can be scripted. Define any building component you like and receive full support for all market standards throughout the BIM process.

These custom parameters are further used in various intelligent processes to workout, adjust, and produce BIM objects on the basis of the information provided early. The processes improve the user’s workflow both via significant savings in time spent, and through the extra scopes.
The new features will be useful for doors and windows manufacturers as they can access the tools to convert their products into parametric BIM objects. The updated version of BIMscript is free for accredited BIMscript developers.

BIMscript automatically generates several parametric BIM and static formats from a single source of development. This accelerates the formation of various formats by 400% compared to traditional methods. Besides, the solution eliminates the requirement for buying multiple CAD/3D/BIM software for development, as well as the requirement for expert knowledge in several systems, because the making of native formats is accomplished by the BIMobject Cloud. With quick hosting, publishing, maintenance, and version handling, the development processes become protected and manageable.
he BIMobject Cloud can produce BIMscript as a batch process. For static file formats formed with BIMscript, such as IFC, DWG, 3DS, and OBJ, BIMobject also creates a 3D-configurator. The users can configure the object in the BIMobject Cloud and then download the consequential version of the product.
To get more updates on BIMscript, go through this link bimobject.com
New updates are available for BIMscript, the exclusive content creation solution by BIMobject

~~~~~~~~~~~~~~~~~~~~~~~~
Published By
Rajib Dey
www.bimoutsourcing.com
~~~~~~~~~~~~~~~~~~~~~~~~

Monday, January 29, 2018

Datakit announces the version 2018.1 of its CAD conversion tools

The latest update of Datakit’s CAD data exchange software range is now available!
This new version of CrossManager, CrossCad/Plg and CrossCad/Ware adds several improvements to Datakit’s interfaces:
- These applications can now read new versions of CAD formats: SOLIDWORKS 2018, NX 12 and DWG 2018.
- CrossManager is now able to convert 3D models to .prc files. This format allows to encapsulate 3D data in a PDF. Thus, CrossManager enables to integrate models coming from most of 3D formats in a PDF. Conversion to PRC is available from more than 20 CAD formats.
- The Revit format (.rvt files) reading is now available, expanding Datakit’s BIM data conversion offering, begun last year with the IFC format.
This new reader enables software vendors to add Revit import capabilities to their own application by using CrossCad/Ware. It also enables end users to convert Revit files to IGES, STEP, 3DPDF and PRC with CrossManager
A Revit file, converted in 3DPDF with CrossManager. The file can thus be opened in Adobe Acrobat Reader™ to be viewed. The instances list of the original model is accessible.
This new interface is able to read geometrical data along with colors and instances contained in Revit 2017.x files
CrossCad/Ware allows to work from Revit files in third-party applications
This version also benefits from the constant improvement of the dozens of CAD converters provided by Datakit. Indeed, they are maintained constantly, in order to improve their quality and to process new entities, while optimizing the execution time.
Datakit tools remains independent of any external API, so it does not require any third-party license to work.

All formats supported by CrossManager
Users wanting to try Datakit software can download it and get a trial license on CrossManager and CrossCad/Plg official pages.
Software vendors interested in CrossCad/Ware, the API enabling them to integrate Datakit technology in their own applications, can visit the API description page and contact Datakit to get information relevant to their activity.
Source: www.datakit.com
Datakit announces the version 2018.1 of its CAD conversion tools
~~~~~~~~~~~~~~~~~~~~~~~~
Published By
Rajib Dey
www.bimoutsourcing.com
~~~~~~~~~~~~~~~~~~~~~~~~

Thursday, January 25, 2018

How to use revit for finding out the pipe sloping in isometric drawing

This revit video tutorial is presented to teach you how to view isometric drawing of piping and determine the measurement map of pipe as well as identify the material symbol of pipe isometric drawing.

You will also learn how to determine the sloping of pipe in isometric drawing, types of valves in piping, types of vales in piping joints, types of pipe fittings materials.

Slope Editor in Revit can be used to assign a slope to whole system or to particular parts of a system. In case of using large slope values, it becomes easier to draw the piping at the preferred angle in a section view or an elevation view.

Watch the following video tutorial to learn the detail process.

~~~~~~~~~~~~~~~~~~~~~~~~
Published By
Rajib Dey
www.bimoutsourcing.com
~~~~~~~~~~~~~~~~~~~~~~~~

Wednesday, January 24, 2018

Bring your Revit model into Lumion with Revit exporters add-on

The Revit users can apply Revit exporters add-on for Revit to save any model in such a format so that it can be read directly in Lumion. Once it is installed, it can be accessed in Revit’s default (3D) view through Add-ins tab -> Export To Lumion

This Revit add-in doesn’t support Autodesk Revit LT versions.


It becomes difficult to seamlessly transmit the materials of your Revit model into Lumion through a normal FBX export.


This Revit add-in is considered as a perfect tool inside your Revit program to bring your Revit model into Lumion. The plugin can easily export any 3d view according to your choice as a collada file that can be imported into Lumion.


Link for download 
Revit exporters add-on

Revit model into Lumion with Revit exporters add-on

~~~~~~~~~~~~~~~~~~~~~~~~
Published By
Rajib Dey
www.bimoutsourcing.com
~~~~~~~~~~~~~~~~~~~~~~~~

Saturday, January 20, 2018

Datakit expands its BIM offer with a Revit format reader

Datakit, a leading company in CAD data exchange, unveil its brand new interface: a library to read Revit files (*.rvt), the native format of the well-known Autodesk’s BIM software.

This new interface expands Datakit’s BIM offering, begun in January 2017 with an IFC reader.

“Following our arrival into the BIM world one year ago, and following the positive feedback from our customers regarding our IFC reader, we have decided to expand our offer in order to also satisfy their native BIM data import needs.”, Explains Olivier Rigollet, CEO of Datakit. « As Revit is the most popular BIM software presently, it was natural to complete our range with this format. After one year of work, we are now able to provide a first version to our customers. »

As the other Datakit’s interfaces, this reader is independent of any external API, so it does not require a Revit license to work.

This new interface has been integrated into CrossManager, the standalone software of Datakit. CrossManager’s users are thus able to convert .rvt files to IGES, STEP, PRC and 3DPDF. New combinations will be available in the future.

Datakit expands its BIM offer with a Revit format reader

A Revit file, converted in 3DPDF with CrossManager. The file can thus be opened in Adobe Acrobat Reader™ to be viewed. The instances list of the original model is accessible.

Software vendors can also take advantage of this new interface in order to provide their users with interoperability with Revit format.

This is possible thanks to CrossCad/Ware: a SDK that can be integrated in a third-party software. By integrating CrossCad/Ware in their own application, software vendors benefit from Datakit’s technology, enabling them to access to Revit format data. They can thus read geometrical data along with colors and instancescontained in Revit 2017.x files. The API integration is easy and is seamless for end users.

Datakit expands its BIM offer with a Revit format reader
CrossCad/Ware enables to support Revit files in your own application.
This tool is ideally suited to BIM software vendors, Indeed, It will enable them to offer their users to work from models initially designed with Revit.
But it is also intended to all other fields’ software vendors who want to offer their users the ability to import Revit data.
Many software vendors already have confidence in the robustness of CrossCad/Ware. Already more than a hundred of software from different fields of activity (CAM, ERP, PLM, visualization, simulation, control, metrology, BIM…) rely on Datakit’s technology to read 3D data.
To try Revit files conversion with CrossManager, or to get more information about the software integration possibilities, you can visit datakit.com or contact Datakit at +33 478 396 369.
You will also be able to meet Datakit team during its visit to BIM WORLD event, in Paris on March 29th, 2018.

Source: www.datakit.com

~~~~~~~~~~~~~~~~~~~~~~~~
Published By
Rajib Dey
www.bimoutsourcing.com
~~~~~~~~~~~~~~~~~~~~~~~~

Friday, January 19, 2018

MEPcontent Product Line Placer for Valves is the newest stand-alone app for Revit

MEPcontent adds another for MEP engineers, the MEPcontent Product Line Placer for Valves. A great stand-alone app for Revit which can also be combined with the MEPcontent Product Line Placer for Piping.

Easily filter on manufacturer, diameter, valve category, or technical properties. Select and place valves in your Revit project and work directly with localized and up-to-date manufacturer specific products.

With the MEPcontent Product Line Placer for Valves app, you can get access to valve series from 6 leading manufacturers (Belimo, Econosto, Oventrop, TA, Victaulic and Watts Industries) and this number will be raised in the future. Choose valves on the basis of on pressure stage and contain fittings and flanges which are added automatically. Make best use of content and localize it with region along with article number, GTIN, manufacturer data and category. Apply the diameter from the pipes to be applied in your model and verify what valves are obtainable to set with your piping system.

The app can save huge time with regard to other leading modeling software. One has to utilize the clear app interface to choose and set valves in your Revit project devoid of various buttons and options to select from. The app can be integrated with other MEPcontent apps like the MEPcontent Product Line Placer for Piping, as well as Stabiplan’s Export and Import Excel app.

One can begin drawing pipes out of your favorite manufacturers like Georg Fischer, SANHA or Pegler Yorkshire. Include valves with this new app from the above mentioned six valve manufacturers. Export your project data from Revit into Excel, modify the data, distribute it with purchasers or management (who perhaps do not possess Revit) and import it back into Revit.

The free version of the Product Line Placer facilitates the users to choose Oventrop valves. Both balancing valves and ball valves from Hydro control and Optibal can be accessed in this version. The MEPcontent Product Line Placer for Valves can be downloaded from store.mepcontent.com at free of cost. In order to get access to the product lines and series from the other brands, upgrade the app to obtain the full version (for 25 euro per month or equivalent in £ or $) and switch among product lines to avail more manufacturer specific content.

MEPcontent Product Line Placer for Valves is the newest stand-alone app for Revit

Read more

~~~~~~~~~~~~~~~~~~~~~~~~
Published By
Rajib Dey
www.bimoutsourcing.com
~~~~~~~~~~~~~~~~~~~~~~~~


Thursday, January 18, 2018

progeSOFT SA released progeCAD’s iCADMac 2018 for Mac

Swiss-based progeSOFT SA released iCADMac 2018, a complete and professional 2D/3D DWG-based CAD system that has the ability to read and write AutoCAD files up to version 2018.

This newest version is compatible with Apple’s macOS El Capitan and High Sierra operating systems. The user interface is significantly improved to simplify the working process.

By applying more complete, contextual menus system, time & the numbers of mouse clicks can be saved significantly.

In iCADMac 2018, there are two user interfaces available for the users. The users can choose from either the classic “light grey” theme or the new “dark 2018” theme. With the help of the vector-based icons in the macOS menu architecture, high-resolution 4K displays are possible on Apple’s computers.

There are various new tools contained in iCADMac 2018 which range from a new AutoComplete feature to accelerate typing commands and system variables. SuperHatch generates an area hatch with an image, a block, an external reference, or a wipeout.

There exist new features for managing hatches and gradients. Trimmed hatches stay associative and function as a single entity. With a revamped dialog box, enhancements are also made to print dialogs. New Auto-Hide palettes are used to break down palettes automatically while shifting the pointer away from the palette. Palettes are expanded automatically while moving your pointer back towards them.

To get more information, click here: www.progesoft.com

progeSOFT SA released progeCAD’s iCADMac 2018 for Mac

~~~~~~~~~~~~~~~~~~~~~~~~
Published By
Rajib Dey
www.bimoutsourcing.com
~~~~~~~~~~~~~~~~~~~~~~~~

Tuesday, January 16, 2018

ParaMatters launched COGNICAD - Cognitive Computer Aided Design Platform For light weight structures

The leading CAD company ParaMatters introduced CogniCAD alias Cognitive Computer Aided Design Platform For Ultimate Lightweighting. It is an exclusive cognitive cloud-based generative design platform which arranges lightweight structures and meta-materials (lattices) by demand, as well as streamlines and curtails the design-to-manufacturing process.

This new platform is applicable for topology optimization. The cloud-based solution is suitable for different types of industries along with a groundbreaking new tool for lightweighting designs.

One can sign up for a free account and then import CAD files into the browser-based software, from which it is possible to indicate the design parameters, along with materials, boundary conditions and loads. Then, CogniCAD looks out for producing the newly optimized and lightweighted design, which can be downloaded easily. All CAD files created by CogniCAD are ready for 3D printing.

The present pricing model is on a pay-per-design basis. The users will be able to purchase tokens (e.g., 100 for $100, 600 for $500, or 1,200 for $1,000), and each optimization needs a number of tokens which are apparently proportionate to the design’s intricacy.

With this newest application, the complete design-to-manufacturing process will be converted by making it independent and automated to form a superior-quality, optimized light weighted designs. The proprietary generative engine automatically provides high performance and quality designs with least user input. Consequently, the whole design cycle is condensed from days to hours, and elevates the quality of generative designs in contrast to what can be obtained by hand.

To evaluate CogniCAD for yourself, go through the following site paramatters.com

ParaMatters launched COGNICAD - Cognitive Computer Aided Design Platform For light weight structures

~~~~~~~~~~~~~~~~~~~~~~~~
Published By
Rajib Dey
www.bimoutsourcing.com
~~~~~~~~~~~~~~~~~~~~~~~~

Friday, January 12, 2018

Download European Wide Flange HEA HEB Profile Steel Sections dwg CAD drawings

Download CAD drawings for European Wide Flange HEA HEB Profile Steel Sections. These CAD drawings are available in .dwg and .dxf formats. All of the available European Wide Flange HEA HEB profile steel column sections which are drawn to 1:10 scale in CAD dwg drawing.

All the drawings can be imported into any project with copy & paste commands without any difficulty. Geometrical dimensions for each section are also demonstrated.

Sections which are contained in this CAD drawings are
HEA(B)100,120,140,160,180,200,220,240,260,280,300,320,340,360,400,450,500,550,600,650


There drawings are very useful structural engineers to simplify and accelerate the steel designing process.
To download these drawings at free of cost, click on the following link www.structuraldetails.civilworx.com

Download European Wide Flange HEA HEB Profile Steel Sections dwg CAD drawings

~~~~~~~~~~~~~~~~~~~~~~~~
Published By
Rajib Dey
www.bimoutsourcing.com
~~~~~~~~~~~~~~~~~~~~~~~~

Wednesday, January 10, 2018

Improve your AutoCAD skills with a series of 30+ AutoCAD 2D and 3D drawings

Jaiprakash Pandey, the renowned mechanical engineer and Autodesk AutoCAD Certified Professional, has conducted an online course for AutoCAD users. The users can enhance their AutoCAD skills with a series of 30+ AutoCAD 2D and 3D drawings.

This course is specifically designed for the users who possess minimum knowledge of AutoCAD 2D and 3D tools as well as for those users who have already finished AutoCAD 2D or 3D courses on SourceCAD.

The course comprises of numerous 2D and 3D drawings which can be used for operating the tools learned throughout the AutoCAD course. There are three main sections which include AutoCAD 2D, 3D and advance 3D drawings of objects from real life like Nut, bolt and gears.


Course Topics:
• 2D and 3D practice drawings
• Downloadable PDF and DWG file with dimensioning
• Frequently updated content
• Advance 3D projects like coupling and Coke bottle included
Pre-requisites:
• Minimum knowledge of AutoCAD 2D and 3D tools
• AutoCAD 2013 or any later version
To register online, go through the following link learn.thesourcecad.com
Improve your AutoCAD skills with a series of 30+ AutoCAD 2D and 3D drawings

~~~~~~~~~~~~~~~~~~~~~~~~
Published By
Rajib Dey
www.bimoutsourcing.com
~~~~~~~~~~~~~~~~~~~~~~~~

Tuesday, January 9, 2018

How to create a flowing & elegant staircase in Revit

In this revit tutorial you will learn the steps for creating the design of a flowing and elegant staircase in Revit.


Given below, some useful revit stair definitions :-
BASE AND TOP LEVELS: Stairs are formed on the basis of selected levels available in the project. If necessary, any offset can be included on these levels.

REQUIRED STAIR HEIGHT: Total distance among the base and the top of the stairs along with the offsets.

REQUIRED NUMBER OF RISERS: It is measured automatically with Revit, by dividing stair height with maximum riser height. This number can be altered to change the slope of the stair.

ACTUAL NUMBER OF RISERS: The number of risers already been modeled.

MAXIMUM RISER HEIGHT: Riser height for your stair will never surpass over this value. This parameter is fixed on the stair type. Normally, equal to code requirements.

ACTUAL RISER HEIGHT: This distance is automatically computed with Revit, by dividing the stair height with the required number of risers.

MINIMUM TREAD DEPTH: On the stair type, indicate the minimum tread depth. While going to start modeling your stair, you should go over this number, but not under.

ACTUAL TREAD DEPTH: By default, this value is identical to minimum tread depth fixed in the stair type. But, if you prefer more depth, a greater value can be set.

MINIMUM RUN WIDTH: Set on the stair type, it is also possible to indicate the minimum run width. It does not contain support (stringers).

ACTUAL RUN WIDTH: By default, it has similarity with the minimum run width. A greater value can be set than the minimum, but a lower value is not recommended.

To learn the entire modeling process, watch the following video.
Video Source: Balkan Architect

~~~~~~~~~~~~~~~~~~~~~~~~
Published By
Rajib Dey
www.bimoutsourcing.com
~~~~~~~~~~~~~~~~~~~~~~~~


Friday, January 5, 2018

Revit Rendering Techniques

This Revit tutorial provides some useful tricks on how to save huge time in your rendering process (for both interior and exterior rendering) with Autodesk Revit Architecture and make superior 3D graphics. The tutorial also focuses on how to accomplish an Autodesk 360 rendering.


This rendering method can be utilized for all your draft rendering views and a few final renderings can be selected for in-product Revit rendering.
Rendering in Autodesk A360 is specifically designed for the students and educators. This software can be used to generate powerful, near-photorealistic visualizations in the cloud through virtually infinite computing power.
Some exciting features:-
Photorealistic rendering: Create spectacular, superior-quality renderings from designs and models with cloud rendering in A360 (US site).
Batch rendering management: Cloud rendering in A360 deals with big batches of rendering jobs in quickest possible time needed on your desktop.
Panoramas, solar studies and illuminance: Accomplish solar study renderings and steer through interactive panoramas. Produce illuminance simulations. Relate environments to rendered scenes.
Interactive Rendering Beta: A real-time photorealistic-rendering surrounding that produces making stunning images and phonograph animations easily.
Revit Rendering Techniques

~~~~~~~~~~~~~~~~~~~~~~~~
Published By
Rajib Dey
www.bimoutsourcing.com
~~~~~~~~~~~~~~~~~~~~~~~~

Thursday, January 4, 2018

Reinforcement modeling in combined footing with Revit

In this Revit tutorial, you will learn how to use Revit for creating the model of reinforcement in combined footing.

There are various tools in Revit which can be utilized for modeling 3D concrete reinforcement in an advanced Building Information Modeling (BIM) surrounding. This presentation offers brief information on how to employ these tools in an efficient manner for the development of complete, detailed, and more accurate reinforcement designs.

The reinforcement tools can also be utilized to add reinforcement, like rebar, reinforcement bars, or fabric to valid hosts, like concrete columns, beams, walls, foundations, and structural floors.

Watch the following video tutorial to learn creating model of reinforcement.

Read more
~~~~~~~~~~~~~~~~~~~~~~~~
Published By
Rajib Dey
www.bimoutsourcing.com
~~~~~~~~~~~~~~~~~~~~~~~~

Wednesday, January 3, 2018

How to transform PDF underlays to AutoCAD Objects

Lynn Allen, Cadalyst contributing editor and Autodesk Technical Evangelist , presents a useful video for AutoCAD professionals. In this video tutorial, Allen provides some useful cad tips to transform PDF files (underlay) to AutoCAD objects.

So, the AutoCAD users can get rid of time consuming tracing on top of PDFs to reproduce objects or draw it from the beginning.


How to import a specific area from a PDF Underlay
1. Choose the PDF underlay.
2. From the PDF Underlay contextual tab, click Import as Objects.
3. At the prompt, click two diagonal points which a rectangular crossing area, or select from one of the other options.
A crossing area is equivalent to a crossing selection. The settings option demonstrates a dialog box in which you can specify the types of objects to import, customization of layers, either the imported objects should be imported as a block, and various other options.
4. Decide whether you desire to retain, separate, or unload the attached PDF once the selected objects are imported.
The specific area of the attached PDF is imported into the drawing as AutoCAD objects.

For more details, watch the following video tutorial.

How to transform PDF underlays to AutoCAD Objects

~~~~~~~~~~~~~~~~~~~~~~~~
Published By
Rajib Dey
www.bimoutsourcing.com
~~~~~~~~~~~~~~~~~~~~~~~~

Tuesday, January 2, 2018

How segmentation of precast walls are done automatically in Revit

This Revit video tutorial sheds light on automatic segmentation of precast walls in Revit. With split command it is possible to obtain wall parts, lifters, bushing and connections grouped automatically into a precast assembly.

Segmentation of precast walls is performed automatically or manually. Prior to start the automatic segmentation, the Configuration Settings should be examined and modified.

The Configuration settings are imported or exported through XML files to distribute the rules over various users without any difficulty, functioning on the similar or various projects.

Lifters, Bracing Inserts and Connections are arranged on the part tab. Here, the types of elements to be utilized and their positions inside precast assemblies are determined.

All the connections and built-in parts belong to Revit families and can be adjusted as per the needs of the project.

On the Segmentation Tab, the rules for splitting are set on the basis of fabrication, transportation or other functional requirements.

For the segmentation of walls, all the walls should be selected and split command should be pressed to form the precast wall assemblies. Lifters, bushings and connection are formed as per the rules from the Configuration settings.

Once the wall segmentation is completed, both the original components and parts (which are just formed) are visible.

The parts are demonstrated to review the effect of the Split in an efficient manner.

Evaluate the original components at any time by toggling among various LODs (Level of Development) smoothly.

For more information, go through the following link blogs.autodesk.com

How segmentation of precast walls are done automatically in Revit


~~~~~~~~~~~~~~~~~~~~~~~~
Published By
Rajib Dey
www.bimoutsourcing.com
~~~~~~~~~~~~~~~~~~~~~~~~

Monday, January 1, 2018

Revit Rendering Techniques

This Revit tutorial provides some useful tricks on how to save huge time in your rendering process (for both interior and exterior rendering) with Autodesk Revit Architecture and make superior 3D graphics. The tutorial also focuses on how to accomplish an Autodesk 360 rendering.


This rendering method can be utilized for all your draft rendering views and a few final renderings can be selected for in-product Revit rendering.
Rendering in Autodesk A360 is specifically designed for the students and educators. This software can be used to generate powerful, near-photorealistic visualizations in the cloud through virtually infinite computing power.
Some exciting features:-
Photorealistic rendering: Create spectacular, superior-quality renderings from designs and models with cloud rendering in A360 (US site).
Batch rendering management: Cloud rendering in A360 deals with big batches of rendering jobs in quickest possible time needed on your desktop.
Panoramas, solar studies and illuminance: Accomplish solar study renderings and steer through interactive panoramas. Produce illuminance simulations. Relate environments to rendered scenes.
Interactive Rendering Beta: A real-time photorealistic-rendering surrounding that produces making stunning images and phonograph animations easily.


Read Continue

~~~~~~~~~~~~~~~~~~~~~~~~
Published By
Rajib Dey
www.bimoutsourcing.com
~~~~~~~~~~~~~~~~~~~~~~~~