adsense analytic

Showing posts with label #models. Show all posts

Wednesday, August 26, 2020

How to use group tool in Revit for multi-storied buildings

 This is a very useful tutorial for Revit users. The tutorial presents brief guidelines on how to apply group tool in Revit with repeating levels when working with multi-storied buildings.

If any buildings contain various floors and the floors are equivalent, then group’s tool can be used to simplify and speed up the process as well as create any modifications rapidly to all the floors.


Given below, some handy tips to create a group in Revit :-

Create a group by selecting the components or existing groups, and utilizing the Create Group tool.

In a project view, choose the required components or existing groups to be needed in the group.

Click Modify | Multi-Select tab  Create panel  (Create Group).


Note: If one element type is only chosen, the respective Modify | tab shows rather than the Multi-Select tab.

In the Create Group dialog, provide a name for the group.

Note: The name of this dialog will differ on the basis of the types of components which are already been selected.

In order to open the group in the group editor, choose Open in Group Editor.

The group editor facilitates you to include or exclude components from a group, attach detail groups (for model groups), and view group properties.

How to use group tool in Revit for multi-storied buildings

~~~~~~~~~~~~~~~~~~~~~~~~
Published By
Rajib Dey
www.bimoutsourcing.com
~~~~~~~~~~~~~~~~~~~~~~~~

Thursday, August 20, 2020

How to transform any PDF or image files in AutoCAD

 Once the drawing is completed in AutoCAD, it is often required to transform it to PDF or image format or take print some of the portion of the drawing. In this AutoCAD video tutorial, you will learn how to do it efficiently.

Given below, the step-by-step processes :-

At first open the drawing

Then zoom it by providing z in command line

Now press ctrl + p for print

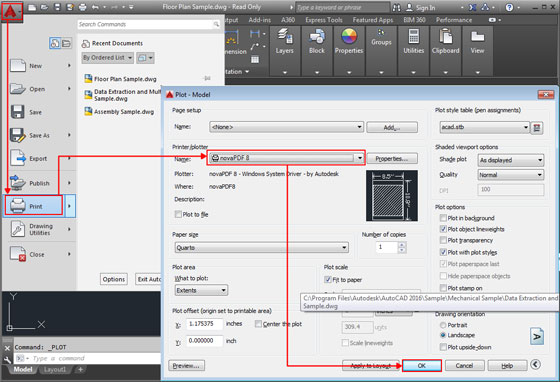
Now in page set up dialog box, go to printer/plotter section and select the option as per your choice. As for instance if you want to transform to PDF, then select DWG to PDF.

Then go to paper size to select page size.

Then opt for what to plot situated under plot area. Then select window from drop down menu.

After going to window, select the portion of the drawing to be converted to PDF or printed.

After selection, click on it to go to page set up again.

You can also click on plot offset option to provide offset toward X or Y axis.

Now, click on plot style table and from the drop down menu opt for grayscale or monochrome etc.

Now, click on scale option situated under plot scale and maintain ratio of scale for the drawing. If it is not required, click on fit to paper option and exit.


How to transform any PDF or image files in AutoCAD

~~~~~~~~~~~~~~~~~~~~~~~~
Published By
Rajib Dey
www.bimoutsourcing.com
~~~~~~~~~~~~~~~~~~~~~~~~

Monday, August 10, 2020

AccuRender nXt Rendering Engine Based Products

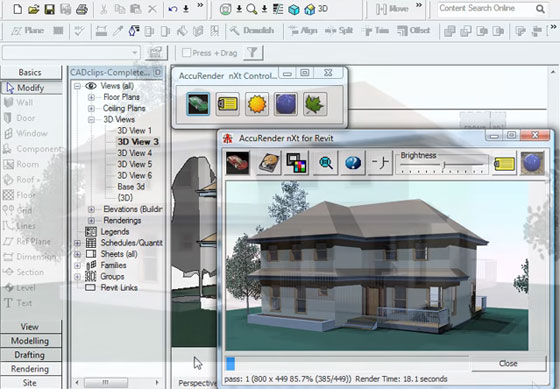
 The Render Plus Systems has delivered another extra Rendering Engine for SketchUp. nXtRender, which depends on the new AccuRender nXt rendering motor from McNeel and Associates, is amazing, simple to utilize and completely incorporated into SketchUp. By characterizing reflection, lighting, straightforwardness and materials in their models, SketchUp clients can rapidly and effectively make photorealistic renderings.

"nXtRender is a perfect, easy rendering answer for SketchUp", said Al Hart, President of Render Plus. "Utilizing the new nXt Engine from McNeel and Associates, nXtRender removes the issue from making incredible renderings rapidly and at a reasonable cost."

Centennial, Co. (July 10, 2009), nXtRender is another rendering application for Google SketchUp from Render Plus Systems. nXtRender utilizes the new AccuRender nXt rendering motor and coordinates it consistently into SketchUp making it probably the least demanding approaches to make photorealistic pictures. nXtRender utilizes ray-follow rendering strategies, reflections, straightforwardness, features, shadows and lighting impacts to deliver reasonable renderings. The last picture created by nXtRender is unequaled by other rendering bundles.

"nXtRender is a perfect, minimal effort rendering answer for SketchUp", said Al Hart, President of Render Plus. "Utilizing the new nXt Engine from McNeel and Associates, nXtRender removes the issue from making incredible renderings rapidly and at a moderate cost."

nXtRender unites three significant highlights that clients need in a rendering bundle: quality – utilizes ray-follow procedures to deliver great pictures, usability – the straightforward and instinctive UI permits the client to handily accomplish the ideal look and ease – so everybody can bear to make excellent rendered pictures.

As indicated by Solo, one of the most current clients, "nXtRender is an exceptionally simple arrangement with some incredible fancy odds and ends included, and is fit for astonishing outcomes."

AccuRender nXt Rendering Engine Based Products

~~~~~~~~~~~~~~~~~~~~~~~~
Published By
Rajib Dey
www.bimoutsourcing.com
~~~~~~~~~~~~~~~~~~~~~~~~

Thursday, May 30, 2019

C3D Viewer 2019 is the updated version for viewing 3D CAD models

C3D Labs, the leading developer of powerful 3D software development toolkits, has just launched C3D Viewer 2019 — an upgradation to its free application for observing 3D CAD models.

PROSTEP software:

The newest CAD file viewer deals with several standard CAD (computer-aided design) formats which range from JT, STEP, X_T and X_B, SAT, IGES, STL, and VRML, and its own C3D file format.
The C3D Viewer 2019 edition integrates some of the geometry modeling, data conversion, and model visualization functionality available in its collateral products, the C3D Modeler, C3D Converter, and C3D Vision—all components of its C3D Toolkit.

Some exciting features in the 2019 version include:

• New Dynamic Section Tool — The new feature allows the users to view and examine internal segments of 3D models through sections created by one or more planes. With the help of OpenGL, 3D Viewer produces results rapidly as compared to other CAD systems, which normally make sections by changing the topology of solids.
• New Measurement and Calculation Tools — This newest feature facilitates the users to calculate the characteristics of geometric models: angles, distances among objects, edge lengths, surface areas, and so on.
The derived linear, diametrical, and angular dimensions are demonstrated clearly in the model window. The viewer also works out the masses, volumes, surface areas, centers of mass, and moments of inertia.

C3D Viewer 2019 is free and compatible with Window 7 through 10.


~~~~~~~~~~~~~~~~~~~~~~~~
Published By
Rajib Dey
www.bimoutsourcing.com
~~~~~~~~~~~~~~~~~~~~~~~~