adsense analytic

Showing posts with label CAD tutorial. Show all posts

Friday, August 3, 2018

Brief Overview Of Reinforcement Tool In Revit

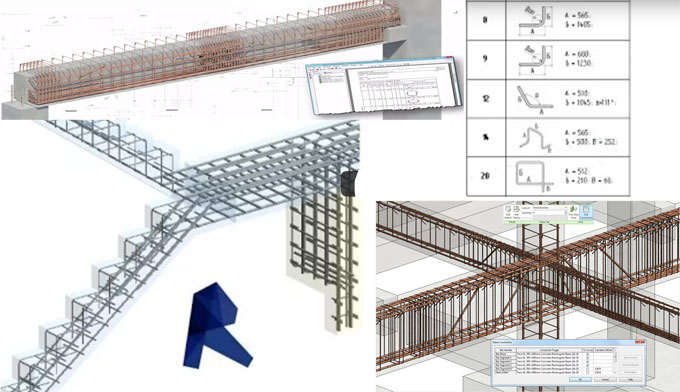
This Revit video tutorial briefly describes reinforcement tool in Revit 2017.
The video focuses on the following topics :-
Comparison ADSK templates 2017 and 2017 Weandrevit
Clamps the inclined beam
Simple task bend angle shaped reinforcement
Limb fixed length
"Enable folds in the form definition"
Error in the rod from the forward portion of the arc and
Spiral reinforcement
Reinforcement beams arc
Problem to the driven parts in Revit 2018
The reinforcement tools can be used to include reinforcement like rebar, reinforcement bars, or fabric to valid hosts ranging from concrete columns, beams, walls, foundations, and structural floors.
Brief overview of reinforcement tool in Revit

~~~~~~~~~~~~~~~~~~~~~~~~
Published By
Rajib Dey
www.bimoutsourcing.com
~~~~~~~~~~~~~~~~~~~~~~~~

Friday, March 4, 2016

How to develop a title block with related attributes

This is an exclusive CAD video on for AutoCAD users. This CAD tutorial will provide you some useful tips to develop a Title Block through related Attributes.

Ensure that the Titleblock is developed in the MODEL space, it is saved perfectly prior to place in it on a Paper Space.

Attributes refer to specialized text in block definitions to be applied as a generic placeholder for generally used text.

Ensure that the Titleblock is developed in the MODEL space, it is saved perfectly prior to place in it on a Paper Space.

Attributes refer to specialized text in block definitions to be applied as a generic placeholder for generally used text.

How to generate blocks with attributes:

1. Draw the geometry as it can be done for any other block
2. Specify attributes
3. Specify the block. While choosing objects for the block, initially select attributes and in order of entry.
4. Put in the block into a drawing.


How to develop a title block with related attributes

~~~~~~~~~~~~~~~~~~~~~~
Published By
Rajib Dey
~~~~~~~~~~~~~~~~~~~~~~

Tuesday, January 26, 2016

How to use isometric dimension and text in an isometric drawing

Go through the following CAD tutorial demonstrated by Jaiprakash, the leading CAD Corporate trainer and designer who currently associated with Ramboll.


The tutorial will teach you how to use AutoCAD based isometric dimension and text in an isometric drawing.

The isometric drawings are very useful for plant industry and with AutoCAD, it becomes easier to create the drawing. Isometric drawing does not refer to a 3D drawing but it is a 2D drawing created by modifying the orientation of drawing. It can be performed with the use of snap and afterwards modifying its style to isometric.

In the latest AutoCAD version, there is a ISODRAFT option. If AutoCAD 2015, the option is available in drafting settings, AutoCAD status bar. It will facilitate the users to instantly switch to isometric drafting mode.

Visit this link, to download isometric drawing https://goo.gl/NHZoXE


~~~~~~~~~~~~~~~~~~~~~
Published By
Rajib Dey
~~~~~~~~~~~~~~~~~~~~~

Wednesday, January 21, 2015

An exclusive cad tutorial video on Autocad limits

Mohammed Sabeer, the well experienced trainer & consultant in Cad, has created the following useful cad tutorial through which he briefly explains with some easy steps the concept of LIMITS in Autocad. One can also gather knowledge on various drawing commands like LINE , CIRCLE , ARC , RECTANGLE etc as well as a wide array of editing commands like ERASE , TRIM , FILLET , MIRROR.


The DRAWING LIMITS command is applied to arrange the size of the drawing space in AutoCAD while beginning a new drawing. It denotes the size of your area. It also helps you to identify drawing limits properly.

To use the drawing limits command, just type limits in command section or one can choose drawing limits in the format menu.


~~~~~~~~~~~~~~~~~~~
Published By
Rajib Dey
~~~~~~~~~~~~~~~~~~~