adsense analytic

Monday, January 30, 2017

How To Apply A Solar Design Study In Revit

This Revit video tutorial provides detailed information on how to create a solar design study in Revit. The tutorial will be useful for building construction. Solar studies in Revit demonstrate the effect of natural light and shadows on the building model.

It is a very quick and simpler method. Initially, you have to establish what view you prefer to run the solar study. It can range from your Site plan, elevations, default 3D view or an internal camera view. The procedure is identical for all. Once you get your desired view, you should configure the sun settings. Choose the Sun path button on the view control bar along the bottom of the drawing window and opt for “Sun settings” to expose the sun settings dialogue box.

With Solar studies, one will be to visualize the effect of natural light and shadows on the exteriors and interiors of projects.

Apply solar studies to realize how shadows from terrain and adjacent buildings impact a site, or where natural light infiltrates a building at particular times of the day and year.


By providing the effect of natural light and shadows on your project, solar studies produce useful information that can help creating impressive passive solar design.

~~~~~~~~~~~~~~~~~~~~~~
Published By
Rajib Dey
~~~~~~~~~~~~~~~~~~~~~~
Tuesday, January 24, 2017

How To Run A Custom Interference Check In Revit

This Revit video tutorial is extracted from a “Revit Essentials: Interference Detection” course conducted by Pluralsight Creative. By going through this Revit video, one will gather knowledge on how to make sure that your Revit construction doesn’t contain interpenetrating elements.

This course will facilitate the Revit users to easily run an interference check on their project as well as alleviate risks.

The course will be conducted by Dzan Ta, a well known technical specialist & Autodesk Certified Instructor, having expertize in various Autodesk AEC software like Revit, Navisworks, AutoCAD etc.

The course will focus on the following topics :-

What is interference checking?
Where and When is it used?
How to run a custom interference check?
How to resolve a conflict within the interference report?


~~~~~~~~~~~~~~~~~~~~~
Published By
Rajib Dey
~~~~~~~~~~~~~~~~~~~~~

Saturday, January 21, 2017

How To Use Spacing Naming Tool In Revit Mep

Earlier, Space Naming tool was an add-in. Now it is integrated with the software. This generally applied functionality is set up with Revit, making the method easy for getting up and running.

Space Naming tool can be applied for renaming spaces in the MEP model to the room names and/or numbers out of a connected architectural model.

Thus, one can get rid of allocating names manually to the spaces and save huge time and make the workflow simple.

In order to recognize spaces devoid of room names while matching the spaces to rooms, just follow this simple trick – prior to add spaces, set the connected architectural model to room bounding in type properties.


~~~~~~~~~~~~~~~~~~~~~~
Published By
Rajib Dey
~~~~~~~~~~~~~~~~~~~~~~

Friday, January 20, 2017

How To Use PCL PartsLab Revit Add In To Generate Unlimited Parts In Any Revit Construction Model

This Revit video tutorial is based on PCL PartsLab, a free revit add-in that can produce unlimited parts with a some simple mouse clicks. The revit add-in can be used to instantly generate, visualize and operate parts in any revit construction model.

The video includes the topics like how to examine existing and associated model content as well as produce parts from all the categories, families and types out of any linked structural design model.

There are context-sensitive hide and isolate tools in PartsLab which are used to visualize any selection of parts smoothly with just one click.


Download Revit 2017

~~~~~~~~~~~~~~~~~~~~~
Published By
Rajib Dey
~~~~~~~~~~~~~~~~~~~~~


Wednesday, January 18, 2017

How To Use SimLab Sketchup Exporter For Revit

SimLab Soft presents a good video tutorial that explains the detailed process for exporting a sketchup model from Revit by applying SimLab SketchUp exporter from Revit.

With SimLab Sketchup exporter, the Revit users will be able to transmit any Revit scene to SimLab composer at any time throughout their Revit session. This sketchup plugin facilitates the users to distribute their design in skp format.

Instruction for application :-
Download the plugin and then set up SKP exporter plugin for Revit
Run Revit and load a model
Open add-ins, Ribbon Tab, and click export from Simlab Skp Exporter


~~~~~~~~~~~~~~~~~~~~~
Published By
Rajib Dey
~~~~~~~~~~~~~~~~~~~~~

Tuesday, January 17, 2017

Demo Of ACAD 360 Mobile App

This AutoCAD tutorial demonstrates AutoCAD 360, a user-friendly application for easy drawing and drafting. With this newest AutoCAD application, the CAD users can view, generate, edit and distribute AutoCAD drawings on their mobile gadget from any remote location.

Some useful features & benefits :-

Generate new CAD drawings or edit and include markups to current drawings directly from any mobile device.

View and deal with the up-to-date plans on job sites or while meeting with clients. Avail innovative layer management, measuring, and annotation tools. Work without online and sync later.

Perform with the latest drawings precisely at the job site. Get updates in actual time through AutoCAD or AutoCAD LT software. Get rid of carrying printed drawings to job sites and visit client. Increase the production and reduce additional work cycles. Avail drawings from a free Autodesk cloud storage account or other cloud accounts, together with Google Drive, Dropbox, OneDrive, and Box.


Download a free trial version of 30-days or buy a AutoCAD 360 Pro version. Learn more: http://www.autodesk.com/products/autocad-360/overview

~~~~~~~~~~~~~~~~~~~~~
Published By
Rajib Dey
~~~~~~~~~~~~~~~~~~~~~

Sunday, January 15, 2017

How To Apply Indirect Lighting In Vectorworks 2017 To Get A Realistic Rendering

This video shows how to use indirect lighting in Vectorworks 2017 for delivering a real-time rendering. Lighting plays a vital role. So, the placing and adjusting lights as well as their settings should be perfect to significantly improve the quality of rendering.

All Vectorworks software packages consist of Renderworks, the best-in-industry rendering feature that is developed with the award-winning Cinema 4D render engine.


~~~~~~~~~~~~~~~~~~~~~
Published By
Rajib Dey
~~~~~~~~~~~~~~~~~~~~~

Friday, January 13, 2017

How To Perform Exterior Rendering With 3ds Max And Vray

This is an exclusive tutorial for 3ds Max and Vray users.

The tutorial will provide step-by-step guidance on the entire rendering process, exporting 3d from modeling software, importing to 3ds Max, render settings, texturing and lighting as well as how to populate your scene etc.


~~~~~~~~~~~~~~~~~~~~~
Published By
Rajib Dey
~~~~~~~~~~~~~~~~~~~~~

Thursday, January 12, 2017

How To Generate Subregion Of A Toposurface In Revit Architecture

A subregion describes an area of the toposurface where a various set of properties can be used. As for instance, material.

Toposurface subregions belong to areas which should be drawn within current toposurfaces.

One can apply subregions to sketch parking lots on a graded surface, roads, or islands. To make the process easy apply a detailed component as a template and apply Pick Lines tool available in subregion editor. It is also possible to lock the boundaries of the subregion to the picked lines of the detail component. The subregion is modified automatically while shifting the detail component.

While generating subregions, no individual surfaces are produced. In order to make individual surfaces to be edited seperately, use the Split Surface tool.


~~~~~~~~~~~~~~~~~~~~~
Published By
Rajib Dey
~~~~~~~~~~~~~~~~~~~~~

Wednesday, January 11, 2017

Some Useful Revit Tips On Exploded Axon Methods In Revit

This is a useful Revit video for Revit users. The tutorial sheds light on how to produce exploded axons view in Revit to explode various components of the building and call them out as diverse sustainability options.

An exploded axon includes the capability to demonstrate all of the excellent 3D work completed in a model.

Besides, clients and owners will be able to understand these views more efficiently as compared to 2D floor plans and elevations.


~~~~~~~~~~~~~~~~~~~~~
Published By
Rajib Dey
~~~~~~~~~~~~~~~~~~~~~

Monday, January 9, 2017

Learn The Basic Of AutoCAD 2016 With 2d Plan Generation For An Architectural House

This AutoCAD tutorial is specifically designed for beginners and based on 2d Plan creation for an architectural house. The tutorial will facilitate the users to gain superior understanding of various basic commands in AutoCAD 2016. By watching this tutorial, you can improve your skills in learning AutoCAD 2016.

The tutorial focuses on various topics like how to draw, define area, develop plan in AutoCAD 2016.

A 2D drawing stands for a flat drawing that highlights balance and symmetry. 2D is non parametric and difficult to use.


~~~~~~~~~~~~~~~~~~~~~
Published By
~Rajib Dey
~~~~~~~~~~~~~~~~~~~~~

This Revit Video Tutorial Sheds Light On Autodesk Revit 2017 Extension

Advance Steel 2017 Extension empowers Autodesk® Revit® 2017 users to instantly link their models to Advance Steel 2017 by applying the export, import and synchronize functionalities to transmit the model BIM data in LOD350 for Structural Steel. This conformity facilitates the users to generate general arrangement drawings, fabrication drawings, BOMs, and NC files for steel structures quickly and efficiently.

With use of synchronized BIM data among applications, the users will be able to update the changes (if any) devoid of reimporting the whole structure. Synchronization also minimizes the risk of probable mistakes by pursuing the changes occurred on the same model in various applications.

With Advance Steel 2017 Extension, the BIM data from the Revit model is imported or exported in other formats like SDNF (Version 2.0 and Version 3.0), CIS2 and PSS.

To get detailed information on Advance Steel 2017 Extension, go through the following link apps.autodesk.com


~~~~~~~~~~~~~~~~~~~~~
Published By
Rajib Dey
~~~~~~~~~~~~~~~~~~~~~

Friday, January 6, 2017

How To Give Mirror Effect To An Object In AutoCAD With Glossiness And Reflection Features

Mufasu CAD presents a nice AutoCAD tutorial for AutoCAD users. The tutorial will teach you the detailed processes for creating mirror effects with glossiness and reflection features.

The two indicated points turn out to be the endpoints of a line around which the selected objects will be mirrored. To create mirror in 3D, this line spcifies a mirroring plane perpendicular to the XY plane of the user coordinate system (UCS) that consists of the mirror line.

It is possible to flip objects around a certain axis to produce a uniform mirror image. Mirroring is suitable for generating uniform objects as one will be able to draw half the object rapidly and then mirror it rather than drawing the whole object.

You flip objects around an axis and it is called a mirror line to make a mirror image. To indicate this temporary mirror line, enter two points. One can select if the original objects should be deleted or maintained.


~~~~~~~~~~~~~~~~~~~~~
Published By
Rajib Dey
~~~~~~~~~~~~~~~~~~~~~

Wednesday, January 4, 2017

Learn The Basics Of Dynamo & Installation Process For Revit

The Revit tutorial is specifically designed to teach you the fundamentals of Dynamo as well as how to download and set up the software to produce your initial graph.

Dynamo stands for an open-source visual programming tool that can simplify the process for developing your own tools in Revit. Dynamo can be used to generate complicated geometry, automate monotonous tasks, and visualize any Revit model all from a user-friendly interface.

Dynamo now fully compatible with Revit 2017 and does not need an extra download.


How to set up Dynamo for Revit 2017: Once Revit 2017 is installed, the users can’t find Dynamo in manage tab instantly. Initially, the users have to run the Dynamo installer again and ensure to verify Revit 2017 to include Dynamo to this new install. Choose the components for installation; remove the components which should not be installed. Click next when everything is ready to process further.

The following video tutorial will help you to install Dynamo for Revit 2017.


~~~~~~~~~~~~~~~~~~~~~
Published By
Rajib Dey
~~~~~~~~~~~~~~~~~~~~~

Sunday, January 1, 2017

Download Sample Cad Drawing Of Inclined Pitched Roof Concrete Slab Reinforcement

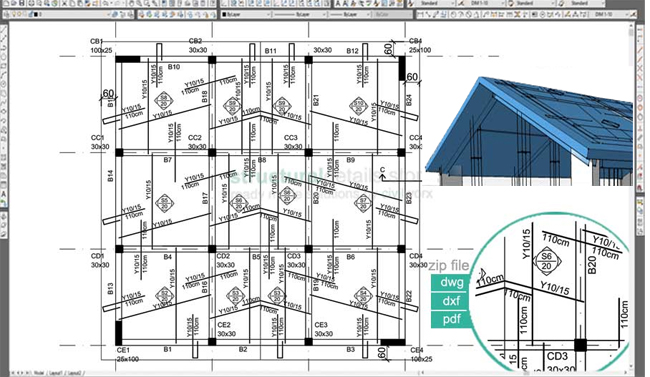
This is a Dwg CAD drawing sample of an Inclined Pitched Roof Concrete Slab Reinforcement. Plan view of a reinforced concrete pitched-inclined slab demonstrates exact positioning of slab reinforcement, cantilever reinforcement, slab thickness, roof apex reinforcement.

Illustration of a 12x12m roof slab with a 4 by 4 column-beam support layout. Reinforcement calculations are done by applying Eurocode 2. Design of slabs is accomplished so as to leave out the deflection checks.

The sample drawing covers the following items :-

• full pitched roof slab reinforcement plan view
• slab & overhang cantilever reinforcement
• roof pitched apex reinforcement
• slab thickness annotation

This comprehensive drawing is available in CAD dwg, dxf and pdf formats and can be applied in any projects and save significant time.

Link for Download sample cad drawing of Inclined Pitched Roof Concrete Slab Reinforcement

Download sample cad drawing of Inclined Pitched Roof Concrete Slab Reinforcement

~~~~~~~~~~~~~~~~~~~~~
Published By
Rajib Dey
~~~~~~~~~~~~~~~~~~~~~