adsense analytic

Showing posts with label Revit 2015. Show all posts

Tuesday, May 3, 2016

How to use Revit for reinforcing simple concrete structure

Go through this exclusive construction video to learn the detailed process for reinforcing a simple concrete structure with the use of Revit 2015.

Revit contains various tools for creating the models of concrete reinforcement in 3D in a sophisticated Building Information Modeling (BIM) surrounding.

These toolset can also be applied to produce complete, comprehensive, and perfect reinforcement designs efficiently. One can utilize the conventional reinforcement modeling, drawing, and scheduling tools for standard rebars and wire fabric mesh.

It is also possible to include reinforcements to concrete structural members like floors, beams, columns, and others through these tools.


~~~~~~~~~~~~~~~~~~~~~~
Published By
Rajib Dey
~~~~~~~~~~~~~~~~~~~~~~

Thursday, December 10, 2015

How to set up and render a scene with V-ray for Revit

If you want to learn the basic operations of V-ray for Revit, then must watch this exclusive youtube video by Chaos Group. This v-ray video will teach you how to set up as well as render a scene with v-ray for revit.

After sign in, visit www.v-ray.com/revit and select the "register here" link to apply the Revit application.

To get more information on the functionalities of V-ray for Revit,, go through the following link :docs.chaosgroup.com

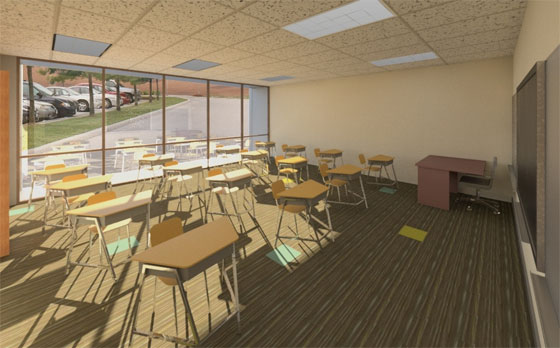
Now designers can enhance their creativity by applying the new tools for VR output, materials and environments. Revit cameras, lighting, and materials are all established for simple acceptance.

The users can perform integrated visualization by accessing all V-Ray design packages ranging from SketchUp, Rhino, and 3ds Max as well as optimize the effectiveness of the project with superior results over various platforms.

V-Ray for Revit features comprise of:

  • A recognizable interface, with user-friendly quality presets.
  • Special global overrides for diagrammatic renderings.
  • Superior post-processing through V-Ray Frame Buffer.
  • V-Ray’s stereoscopic camera for VR output.

V-Ray for Revit is compatible with Revit Architecture 2015, 2016, Revit MEP 2015, 2016, Revit Structure 2015, 2016, Revit Building Design Suite 2015, 2016


V-Ray for Revit
Image Courtesy: docs.chaosgroup.com
~~~~~~~~~~~~~~~~~~~~~~
Published By
Rajib Dey
~~~~~~~~~~~~~~~~~~~~~~

Monday, November 9, 2015

Autodesk Seek Extension for Revit

This is an exclusive online presentation from Autodesk. This Revit video will show you how to apply Autodesk Seek for Revit to efficiently obtain superior quality BIM models, drawings as well as product specifications for over 66,000 commercial and residential building products illustrating more than 400 manufacturers within Revit 2015 or 2016.


Autodesk contains the following useful features :-

  • Instantly explore or looks over 66,000 products.
  • Smoothly arrange RFA or RFAs involving extra Type Catalogs.
  • Examine and view product details prior to incorporating into your project.
  • Efficiently identify the download location for your files and your search results page size preference.

Link for download apps.autodesk.com/


~~~~~~~~~~~~~~~~~~~~~~
Published By
Rajib Dey
~~~~~~~~~~~~~~~~~~~~~~
Tuesday, April 7, 2015

Revit 2015 User Interface Tips and Tricks

Revit 2015 User Interface Tips and Tricks
This is a learning process how to make use and customize the user interface to boost the productivity and simplify your workflow.


  1. How to customize the Quick Access Toolbar,
  2. How to alter the look of the Ribbon, moving Palettes, changing double-click actions tab Switching Behavior.
  3. This also makes the keyboard shortcuts.

Reference: - www.portal.imaginit.com and Veredith Keller, IMAGINiT Building Solutions

~~~~~~~~~~~~~~~~~~
Published By
Rajib Dey
~~~~~~~~~~~~~~~~~~

Monday, March 30, 2015

Brief Overview of Visual Styles in Revit 2015

Brief Overview of Visual Styles in Revit 2015
Travis Van Clieaf has briefly explained some of the visual style features contained in Revit 2015. The users can define various dissimilar graphic styles for a project view. Visual styles are grouped together with model display, shadows, lighting, photographic exposure, and background options.


By going through this video the Revit users can learn some of the methods useful for generating a sketched and conventionally rendered view and afterward use that feature as a View Template over multiple views.

Watch the following exclusive video presentation.


~~~~~~~~~~~~~~~~~~
Published By
Rajib Dey
~~~~~~~~~~~~~~~~~~

Sunday, March 22, 2015

Learn cloud based rendering with Revit 2015

Learn cloud based rendering with Revit 2015
Travis Van Clieaf presents a useful Revit tutorial for Revit users that is based on rendering to the cloud through Revit 2015. The Revit users can learn how to set-up a render from inside of Revit as well as some post processing methods once the render will be finished.

Download Revit 2015 Free Trial


Travis Van Clieaf presents a useful Revit tutorial for Revit users that is based on rendering to the cloud through Revit 2015.
Image Courtesy: feedback.autodesk.com
~~~~~~~~~~~~~~~~~~
Published By
Rajib Dey
~~~~~~~~~~~~~~~~~~

Monday, March 16, 2015

Octane Render for Revit 2015

Octane Render for Revit 2015
Octane Render is world first GPU based and un-biased physically based render. It generally uses the video card in the PC to render photorealistic result in sharpest way. This permits the customer to make stunning works in a part of the time of traditional CPU based renderers.


Octanerender is wholly GPU accelerated and renders imagery at acute speeds, up to 50x quicker than CPU based unbiased renderers. Thanks to its instinctive workflow, Octanerender is extremely simple to use even if customer don't have any past rendering knowledge.

The real-time 3D scene editing permits the consumer to alter camera viewpoints, lights, materials and object positions, seeing the transformation right away update the viewport providing a very fun, fast and easy rendering knowledge. Speed, Quality, Material and Lighting are the main things of Octane.

Speed: Octane Render uses the unused muscle of the modern GPU match up to the traditional, CPU based engines. With the current GPU technology, Octane Render can create final images 10 to 50 times faster than CPU impartial render engines, or even more with multiple GPUs.

Quality and Flexibility: Octane Render not only gives unbelievable speed, but does so with unbending quality. The Browsing of website gallery and user forums without difficulties made it demonstrating the fact.

Material and Lighting: Materials can create or break a render. Octane Render permits wheeling over materials and with its real-time engine takes the guesswork out of tweaking materials. The modification can be seen right away. Just as in photography, the lighting of the scene is vital. It is using an HDRI file, mesh emitters, IES files, or a sun/sky system, lighting in Octane Render permits for whole control.

Revit Octane render 2015 can be understand by this video well:


~~~~~~~~~~~~~~~~~~
Published By
Rajib Dey
www.bimoutsourcing.com
~~~~~~~~~~~~~~~~~~

Thursday, February 26, 2015

Revit 2015 MEP - Calculations and Performance

Revit 2015 MEP - Calculations and Performance
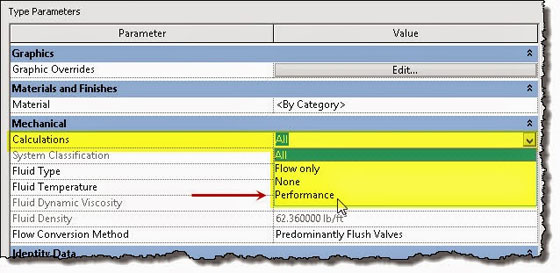
When Revit 2015 Update unleash third version, it offered a brand new MEP setting became offered for Pipe and Duct Systems referred to as Performance Mode. If you examine the kind of properties of a Piping system (or Duct) you will find this extra setting.


When Revit 2015 Update unleash third version, it offered a brand new MEP setting became offered for Pipe and Duct Systems referred to as Performance Mode.
Image Courtesy: revitoped.blogspot.in

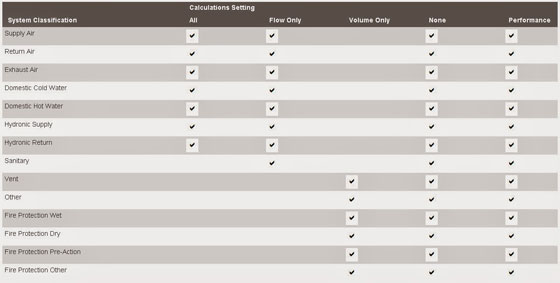
The help documentation offers this table to interrupt down those system classification calculations are created available to USA and that are ready to benefit of this new Performance selection.

This means to boost performance once working/editing massive MEP system networks. For every system kind we decide to assign this Performance setting to, Revit's system propagation is disabled on each system assigned thereto system kind. The Calculations parameter is enclosed in schedules, which may create it easier to toggle on and off.

At first look it does not appear a lot of totally different from selecting None as a result of to revive system propagation we've to vary the setting back to use a calculation methodology, aside from Performance or None. My initial expectation was that none would pack up calculations entirely and Performance would allow therefore me calculations however do so in an exceedingly method that may improve my expertise or perception of performance, Revit's responsiveness as I work.

As I've learned from the developers, despite carrying a reputation that {means|that implies} to me otherwise, beneath the hood, mistreatment none of them doesn't tell Revit to utterly ignore everything associated with the connected network. This new Performance setting will enable Revit to utterly ignore any system (as so much as calculation propagation is concerned) that's assigned to the Performance setting.

As I perceive them, the 2 decisions area unit a trade off between accretive slower performance for every and each model (our) interaction (by selecting None) or having a faster response (from Revit) for every model interaction, selecting instead to endure a extended wait once turning back on calculations (using Performance). Maybe during a} future unleash we'll simply see none of them eliminated or replaced by Performance? At the very least i feel the naming may be a bit deceptive.

An aspect result of mistreatment this setting is that duct/pipe filler and also the System Inspector won't work on systems that area unit assigned thereto either.


When Revit 2015 Update unleash third version, it offered a brand new MEP setting became offered for Pipe and Duct Systems referred to as Performance Mode.
Image Courtesy: revitoped.blogspot.in

Author: Steve

~~~~~~~~~~~~~~~~~~~~~~
Published By
Rajib Dey
~~~~~~~~~~~~~~~~~~~~~~
Monday, February 16, 2015

An exclusive video tutorial on Title Block in Revit 2015

Revit contains a special family known as Title Block which is identical to standard families but there are some supplementary features specific to title blocks. As for example, the revision schedule is considered as the most noteworthy.

To start from the beginning, select new and select title block. From there, choose a template for the title block. Beyond the box, there will be some easy templates which are essentially outlines of the sheet at the preferred size.

As for instance, opt for A1 metric. You will be directed to a very basic title block involving 4 lines & making up the sketch of a metric sheet of 841mm wide x 594mm high.

If there is an obtainable CAD Title Block, it can be imported to Revit as well as save a lot of time while generating one from the beginning.

Go through the following exclusive revit video tutorial that focuses on title block stamp with Revit 2015.


Get more updates on Revit Title Block.

~~~~~~~~~~~~~~~~~~~
Published By
Rajib Dey
www.bimoutsourcing.com
~~~~~~~~~~~~~~~~~~~

Tuesday, January 27, 2015

Timber Framing Plugin for Revit 2015

This exclusive video presented by Raido Puust. Rafter Timber Framing Framing is a part of the plug-ins that allow to add the roofs of rafters.


~~~~~~~~~~~~~~~~~~~
Published By
Rajib Dey
~~~~~~~~~~~~~~~~~~~

Monday, January 19, 2015

Revit Rendering and Export to 3ds Max

This webinar covers practical workflows for taking Revit models into 3ds Max and creating stunning visualisations. It was presented by Florian Neumayr, Technical Consultant at A2K Technologies.


~~~~~~~~~~~~~~~~~~
Published By
Rajib Dey
~~~~~~~~~~~~~~~~~~


Tuesday, November 11, 2014

How to import a Land.xml file into Revit 2015

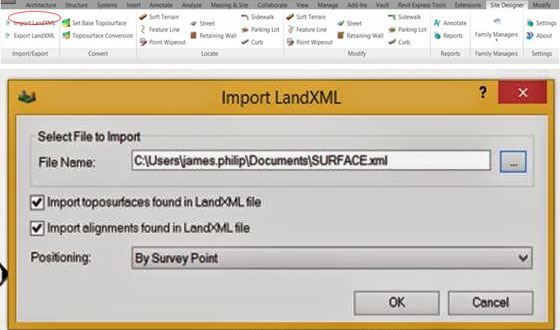
The import LandXML tool in the Site Designer plugin for Revit 2015 is easy to use and solves the problems surrounding the transfer of coordinate systems.

James Philip, famous blog writer and personality on Revit issues has write this in his recent port incadlinecommunity.co.uk.

The import process is as follows: First load the Site Designer plug in from the Subscription Center. Once installed select the Site Designer tab in the Revit interface and chose the Import LandXML tool.

The Import LandXML dialogue box appears. Pick the button next to the file name and choose the file to import. To transfer the coordinate system the imported file choose the positioning option By Survey Point.

  • Then pick the named surface from the Toposurface selection dialogue box.
  • In the Toposurface Information Dialogue box, choose the Add as new Toposurface button.
  • Select OK in the Ribbon Information dialogue box.
  • Choose OK to complete the process.
  • Switch to the Site view and zoom to fit to see the surface. Please note that if you are using OS map coordinates when you zoom to fit the view will show from the origin to the extent of the surface, so further navigation will be necessary to see the imported surface.
  • The finished result should look something like this.

How to import a Land.xml file into Revit 2015

~~~~~~~~~~~~~~~~~~~
Published By
Rajib Dey
~~~~~~~~~~~~~~~~~~~