adsense analytic

Friday, November 30, 2018

Some useful tips to draw front elevation in AutoCAD

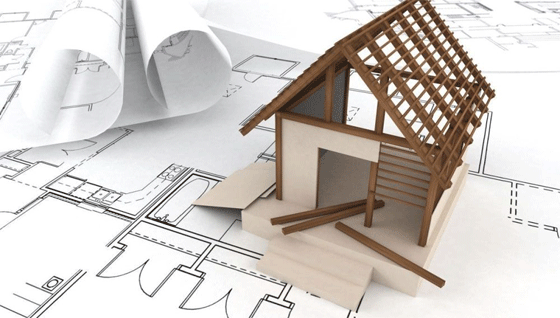
In this autocad video tutorial, you will learn some useful tips to draw front elevation of any building.

Once a elevation line is drawn, it is necessary to extract an elevation from the elevation line and the objects picked up in the building model.

As soon as a 2D elevation is created, the object produced is a 2D Section/Elevation object. Both 2D sections and elevations contain the equivalent object type and style.

Prior to generate an elevation, thaw and activate all layers of objects in the building model that should be contained in the elevation. The Objects on layers which are off or frozen cannot be segment of the selection set for the elevation. To make the performance better, deactivate the layers of the objects that should not be contained in the elevation.

2D Elevations: 2D elevations are produced by drawing an elevation line in front of a number of objects and then generating a 2D elevation object out of them. The elevation object is drawn devoid of hidden and overlapping lines.

It is possible to edit a 2D elevation by modifying its object display properties or its style display properties. The 2D elevation style facilitates the users to include display components to the display illustration of the elevation and develop rules that assign various parts of the elevation to several display elements.

The visibility, layer, color, linetype, lineweight, and linetype scale of every elements can be easily managed. It is also possible to assign a material like a brick or concrete hatch, to individual components of the object or the style. Furthermore, you can use linework editing commands to assign lines in a 2D elevation to several display elements, and combine geometry into a 2D elevation. The users can dimension 2D elevations.

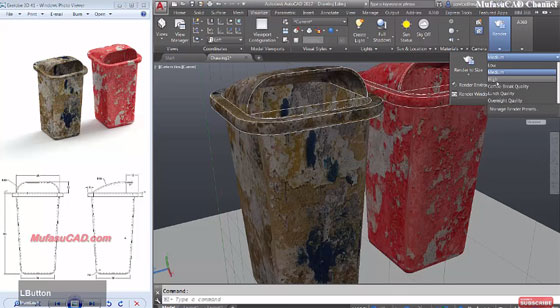
3D Elevations: 3D elevations are produced by drawing an elevation line in front of a number of objects and then generating a 3D isometric elevation object out of them. The styles are not employed in 3D elevations.

The display of subdivisions inside 3D elevations can be managed easily. With the use of the Hidden Line Projection command, the users can generate 2D hidden line projections of any view of the 3D elevation that can be exploded and edited or hatched.

To learn the tricks to draw front elevations in AutoCAD easily, go through the following video tutorial.

Some useful tips to draw front elevation in AutoCAD

Read more
~~~~~~~~~~~~~~~~~~~~~~~~
Published By
Rajib Dey
www.bimoutsourcing.com
~~~~~~~~~~~~~~~~~~~~~~~~

Monday, November 26, 2018

SOFiSTiK Bridge Modeler – A robust software to apply BIM in bridge design & modeling

Sofistik, the leading software developer, has launched SOFiSTiK Bridge Modeler that can be used to develop parametric bridge models with alignment parameters.

It is user-friendly tool for bridge planners all through the globe. The software produces completely parametric input and semi-automated, adaptable plan creation, simplifying the process to analyse several design variants.

With SOFiSTiK, it becomes easier to obtain step-by-step complicated geometries based on the smallest detail. It can be performed by first selecting one or more axes from the road planner or by specifying the axes out of horizontal or vertical layout information. Then the required bridge cross-section is chosen from the adjustable cross-section families the software offers.

The Bridge Modeler contains advanced modeling capabilities and parameterization of the whole structure to make simple and easy analysis of numerous variants along with the computation of dimensions and costs.

The model is utilized to automatically create cross-sections with pre-dimensioned views and sections. These and other user-generated views or lists are also automatically modified with regard to modifications to the model.

The users can also produce a developed section cut of the model in Revit and add tags to it.

The software supports BIM in Bridge Design and Detailing. The users can produce parametrized 3D bridge models with alignment parameters and generic families in Autodesk® Revit® 2019.

To get more details about the software, go through the following link www.sofistik.com

SOFiSTiK Bridge Modeler รข€“ A robust software to apply BIM in bridge design & modeling
~~~~~~~~~~~~~~~~~~~~~~~~
Published By
Rajib Dey
www.bimoutsourcing.com
~~~~~~~~~~~~~~~~~~~~~~~~

Saturday, November 24, 2018

A position is vacant for Revit Designer in US locations

Alex Pettas Architecture is a three-year old architecture firm based at Los Angeles just east side of Culver City in CA and currently they are working on residential projects in Bentwood, the Hollywood Hills, San Francisco and Sonoma County as well as retail projects. Their aesthetic is rooted in California modernism.

Currently they have urgent need for a highly stimulated Designer for playing an essential role in the design and production of projects from concept through Construction using Revit.

They are looking for a candidate who is immensely passionate and dedicated about architecture, has a strong work experience and also enthusiastic to play a vital role to their projects while handling them carefully. They belong to an office culture which is creative, communicative and collaborative.

Qualification, Skills and Requirements:

• Applicants must have an experience of 1-4 years in an architecture firm.
• A degree from an authorized architecture program is a must have thing.
• Revit experience with proficiency in Adobe CC is needed.
• A candidate should be self-starter who will able to manage multiple assignments.
• He or she should be strong enough in communication like gin graphic, written and verbal.
• Candidate should be attentive to little details and go for thorough process.


Technology Experience and Expertize:

• Candidate must examine agency needs, ensure code compliance and control permitting process.
• Research finish materials and products.
• Have to flexible enough to handle clients and attend project site meetings.
• Candidates who live around Log Angeles have to be the legal work ability in the U.S.


Benefits: They are offering a competitive salary, paid time off, health insurance benefits, bonuses and ARE exam subsidies; there will be also bonus day off during the year-end holidays. But they don’t sponsor H1b applicants.

Contact info: Interested person can email their resume and portfolio to info@pettas.com. Attachments should be no longer than 15 MB.

Apply now: archinect.com

A position is vacant for Revit Designer in US locations

~~~~~~~~~~~~~~~~~~~~~~~~
Published By
Rajib Dey
www.bimoutsourcing.com
~~~~~~~~~~~~~~~~~~~~~~~~

Monday, November 19, 2018

A position is vacant for BIM analyst in US locations

BLDGWORKS, a growing construction integration, real estate development, and architecture firm, is inviting applications for the position of a BIM analyst on full time basis for the locations of New York, NY, US.

The objective of BIM Analyst is to employ virtual projects controls with a large corporate client involved in a large portfolio of work around the world. The BIM Analyst has to make design and construction of Building Information Models to facilitate QTO and cost analysis.

This role provides the scope toward any member of the Architect / Engineer / Construction community with an interest in BIM (3D,4D,5D modeling) to fully employ and delve into these methods of documentation.


Academic Experience:
• Degree in architecture, engineering, construction, project controls, or related fields required
• 0-3 years experience with BIM platforms (mainly Revit)
• Interest in project controls, QTO, and cost analysis
• Exhibition of leadership skills
• Capability to think innovatively and strategically to provide solutions
Technology Experience and Expertize:

• Experience with Revit highly desired
• Experience with Rhino preferred but not essential
• Experience with Dynamo will give added advantage but not essential
• Experience with Python scripting will give added advantage but not necessary
• Experience with Revit API will give added advantage but not essential
• Salary structure will be equivalent to experience.
• Contribution to healthcare
• Paid Time Off
BLDGWORKS inspires the employees to perform towards NCARB licensure, AIA membership, and other certifications like LEED. If any candidate possesses any such licenses and certifications, he/she will get special consideration.
Prospective candidates should send a cover letter, resume, and portfolio along with salary requirements to office@bldg-works.com
A position is vacant for BIM analyst in US locations
~~~~~~~~~~~~~~~~~~~~~~~~
Published By
Rajib Dey
www.bimoutsourcing.com
~~~~~~~~~~~~~~~~~~~~~~~~

Saturday, November 17, 2018

How AutoCAD is used for drawing column layout plan

Fundamentally, column layout plan is drawn with hand or AutoCAD. Given below, some useful step-by-step guidelines for column layout drawing with AutoCAD.

The following steps are involved :-


1. Select Column Shape: Initially, select the column shape. Several types of column shape are applied in diverse structures which range from circular, rectangular, box type column. Hence, it is important to select the column shape beforehand.
2. Draw the Column: As soon as the column shape is selected, then draw the column by applying the commands as rectangle (rec+Enter) or circle(c+Enter).
3. Settle the Column Location: Placement of column is considered as the most crucial part of a structure. The construction of a structure is based on the location of the column. Therefore, all the columns should be arranged at the exact location.
4. Settle the Grid Line: Gridline is a very significant segment of a structure since the position of all sections of the structure is set based on the grid line. The grid line should be drawn (horizontal & vertical) with line (l+Enter) or construction line (xl+Enter) command.
5. Numbering the Grid Line: The grid line should be numbered with a, b, c or 1,2,3 serially. It facilitates to trace something quickly and effectively.
6. Settle the Dimension with regard to Grid Line: Settle a dimension of all column relating to grid line with dim leaner (diml+Enter) command as except dimension it becomes complicated to trace the position of the column.
7. Numbering the Column: Locate a column to check that the schedule is not possible devoid of proper numbering. Therefore, the column should be numbered depending on its size & reinforcement.

How AutoCAD is used for drawing column layout plan
~~~~~~~~~~~~~~~~~~~~~~~~
Published By
Rajib Dey
www.bimoutsourcing.com
~~~~~~~~~~~~~~~~~~~~~~~~

Thursday, November 15, 2018

Some handy tricks for curtain walls in Revit

In this revit tutorial, one can learn some useful tips to generate curtain walls in Revit.

The curtain wall tool in Revit is mainly applied for walls having complicated patterns, special railings and even casework.

The curtain walls comprise of similar features of a basic wall. They include bottom and top constraints and their profile is rectified.

There are some major additional features in the curtain walls :-

Curtain Grids
These belong to division formed on the walls. These divisions can be horizontal or vertical.


Mullions
Mullions are components which can be produced on each curtain grid section and on each curtain wall extremities.


Curtain Panels
Curtain panels belong to rectangular components which are situated among each curtain grids.


Curtain Walls are generated in the same manner similar to regular walls. Choose the wall tool in the architecture tab.

While selecting a type, it is necessary to scroll down to opt for a wall in the curtain wall category. These walls contain a glass icon next to them.

Go through the following video tutorial to get familiar with the tips for curtain walls.

Some handy tricks for curtain walls in Revit

Read more
~~~~~~~~~~~~~~~~~~~~~~~~
Published By
Rajib Dey
www.bimoutsourcing.com
~~~~~~~~~~~~~~~~~~~~~~~~

Tuesday, November 13, 2018

Details of Bluebeam Revu

Bluebeam Revu facilitates the projects to remain on track.

Bluebeam Revu allows the project teams to remain on the same page through the design process as well as drive the project forward throughout the construction, and maintains vital project data through completion and beyond.

Design: Revu quickens the design reviews by facilitating the project partners to mark up and collaborate on the similar documents in real time, or any time.

For architects, engineers and contractors, the markup and collaboration tools in Bluebeam Revu facilitates rapid, more precise and more thorough quality reviews.

Construction: Measurement tools in Revu facilitate you to capture a project’s correct scope and make a stronger bid to provide you the competitive edge.

Revu streamlines submittals with powerful markup and editing tools, and amalgamates effortlessly into several document management systems so that the project can run successfully.

Revu retains RFIs clear and organised with smart markup, hyperlinking and visualisation tools and in this way the project remains on track.

By arranging and summarising punch items within drawings, Revu facilitates the project teams to obtain a 90% completion rate on first backcheck.

Completion: With the use of dynamic document creation tools in Revu, it is possible to deliver smart O&Ms as well as provide instant and easy digital access to vital project information.

Details of CADS RC3D for Revit

Read more

~~~~~~~~~~~~~~~~~~~~~~~~
Published By
Rajib Dey
www.bimoutsourcing.com
~~~~~~~~~~~~~~~~~~~~~~~~

Monday, November 5, 2018

How to create a 3D trash can model in AutoCAD

Musafu Cad comes with another informative autocad tutorial. In this tutorial, you will learn the tips to create the design of a trush can (garbage basket) in 3D with autocad. The tutorial is designed for beginner’s autocad users.

The dimension in the rendered image can be provided with texture editor. You need to click at left part (where TEXTURE EDITOR is inscribed). Subsequently, you have to edit sample size value or Offset.

The similar process should be followed with MATERIALS EDITOR. If you enquire about render size, you can perform that in Render presets manager, just type RENDERPRESETS.

To get online demonstration of the process, go through the following video.

How to create a 3D trash can model in AutoCAD

Read more

~~~~~~~~~~~~~~~~~~~~~~~~
Published By
Rajib Dey
www.bimoutsourcing.com
~~~~~~~~~~~~~~~~~~~~~~~~

Friday, November 2, 2018

A position is vacant for an Architectural Designer/Drafter in New York

Robert Morris & Co. is inviting applications for an Architectural Designer/Drafter in Meatpacking, New York office.

The prospective candidate should have the following abilities :

• Graduate of a NAAB recognized 4 or 5 year architecture school
• At least 3 years' experience in the production of wood-frame residential construction drawings and millwork/cabinetry detailing, preferably conventional types.
• Eagerness to work on both single-family high end residential projects and multi-family projects
• Sound knowledge in AutoCAD
• Expert knowledge in Revit, SketchUp modeling, Adobe Photoshop, and formation of presentation materials
• Experience with NYC DOB and LPC application submissions is essential
• Experience and knowledge of NYC building codes

• Sound oral and graphic communication, organizational and collaborative skills
• Being able to work independently from home OR at office location
• Presently qualified to work in the U.S. on a part-time basis, without future employment sponsorship required.


This position is available on a freelance basis. There are no benefits at this time but a competitive hourly rate will be offered. Qualified candidates should provide a cover letter, resume, and work samples in PDF format (15MB max).
To send application, click on the following link archinect.com

A position is vacant for an Architectural Designer/Drafter in New York


~~~~~~~~~~~~~~~~~~~~~~~~
Published By
Rajib Dey
www.bimoutsourcing.com
~~~~~~~~~~~~~~~~~~~~~~~~